
Facts About Mouth-to-Mouth Resuscitation in Children
- If a child stops breathing, it is vital to start mouth-to-mouth resuscitation immediately
- Cardiac arrest in children is often caused by oxygen deficiency
- Establish first that there is not any foreign matter in the mouth and throat or airways that needs to be removed before mouth to mouth resuscitation can begin
- Unfortunately, children often do not get heart lung guidance, partly because of insecurity and anxiety to harm the child
- Cardiac arrest in children is often caused by oxygen deficiency and not so often acute heart disease
Mouth-to-Mouth-and-Nose Resuscitation on a Child Under Age 8 or on an Infant
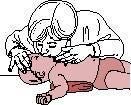
- Place the child on a hard, flat surface.
- Look into the mouth and throat to ensure that the airway is clear. If an object is present, try to sweep it out with your fingers. If unsuccessful and the object is blocking the airway, apply the Heimlich maneuver. If vomiting occurs, turn the child onto his or her side and sweep out the mouth with two fingers.
- Tilt the head back slightly to open the airway.
- Place your mouth tightly over the nose and mouth. Blow two quick shallow breaths (smaller breaths than you would give to an adult). Watch for the chest to rise.
- Remove your mouth. Look for the chest to fall as the child exhales.
- Listen for the sounds of breathing. Feel for the child’s breath on your cheek. If breathing does not start on its own, repeat the procedure.
Mouth-to-Mouth Resuscitation on a Child Age 8 or Older or on an Adult
1. Make sure the person is lying on a hard, flat surface. Look into the mouth and throat to ensure that the airway is clear. If an object is present, try to sweep it out with your fingers (wear disposable surgical gloves if they are available). Apply the Heimlich maneuver if unsuccessful and the object is blocking the airway. If vomiting occurs, turn the person on his or her side and sweep out the mouth with two fingers. Do not place your finger in the mouth if the person is rigid or is having a seizure. |
2. Tilt the head back slightly to open the airway. Put upward pressure on the jaw to pull it forward. |
|
3. Pinch the nostrils closed with thumb and index finger. Place your mouth tightly over the person’s mouth. Use a mouthpiece if one is available. Blow two quick breaths and watch for the person’s chest to rise. |
4. Release the nostrils. Look for the person’s chest to fall as he or she exhales. Listen for the sounds of breathing. Feel for the person’s breath on your cheek. If the person does not start breathing on his or her own, repeat the procedure. |
For children over 1 year
- Create a free airway by removing any foreign matter from the mouth and throat. Check that there is nothing blocking the respiratory tract
- Keep the airway open
- Make sure the child’s head is tilted backwards. Hold one hand on his / her forehead and check with the other hand’s index finger and middle finger
- Inlet
- Squeeze together about the child’s nose
- Blow deep in, seal your lips over the baby’s mouth
- Blow evenly into the mouth until you see the chest rising. When the chest is raised and lowered in connection with the inflow, it is a confirmation that you are performing the treatment properly
- If the chest does not rise, check that the head is far enough backwards and that you have completely closed your nose
- Make 5 blowouts then assess whether breathing or pulse circulation has occurred
- Check the circulation
- See, feel and listen for signs of circulation – breathing, movements and the host. These observation intervals should not last longer than 10 seconds
- If there are signs of circulation, continue mouth-to-mouth with approx. 20 inlets per minute. Check the circulation again every minute
- If there is no evidence of circulation, start heart rate guidance immediately ( child )
- Put the child in stable sideways
- If the child starts to breathe again, place them on their side
- Register regularly: awareness level, pulse, breathing – until help arrives
For children under 1 year
- Open airway
- Place a hand on the child’s forehead. Carefully bend your head backwards
- Only remove visible foreign matter from the mouth with your index finger and thumb
- Lift the child’s garden with one finger from the other hand
- See, feel and listen if the child is breathing
- Look along the chest after movements, listen to breathing and feel after breath for your child for 10 seconds
- If the child breathes, check for life-threatening injuries. Keep your neck and back in stable position
- Inlet
- Blow in and place your lips around the baby’s mouth and nose to form an airtight seal
- Blow calmly and evenly, but not hard until you see the chest raises
- Check that the chest drops down again
- Lift your mouth away from the child’s face and see if the chest falls back together
- If the chest raises when you blow in and sink down when you remove your mouth, it is a sign of properly performed mouth-to-mouth method
- If the chest does not rise, check the child’s main position. Try several times
- If you still do not get the chest to rise, it may be a foreign body in the airway that closes the respiratory tract. Then follow the instructions for foreign bodies in the respiratory tract
- Check the circulation
- Look, feel and listen for signs of circulation like breathing, cough or movements for up to 10 seconds
- If there are signs of circulation, continue mouth-to-mouth inflow at a rate of 20 per minute. After each minute, check for signs of circulation
- If there are no signs of circulation, start with a heart rate guide ( child )